
Now Reading: LED Brightness Control using PWM on ESP8266
-
01
LED Brightness Control using PWM on ESP8266


Introduction
The ESP8266 does not have a true analog output, but it uses PWM (Pulse Width Modulation) to simulate it. With PWM, you can adjust the LED brightness smoothly instead of just turning it ON or OFF.
In this tutorial, you will learn:
- What PWM is and how it works on ESP8266
- Circuit to connect LED with ESP8266
- Arduino code to fade an LED using PWM
- Step-by-step explanation
What is PWM?
PWM stands for Pulse Width Modulation.
- Instead of giving a continuous analog voltage, ESP8266 switches the pin ON and OFF very fast.
- The ratio of ON-time to OFF-time is called Duty Cycle.
- Higher duty cycle = LED looks brighter
- Lower duty cycle = LED looks dimmer
On ESP8266, the PWM value range is 0 – 1023:
0→ LED completely OFF512→ LED at 50% brightness1023→ LED fully ON
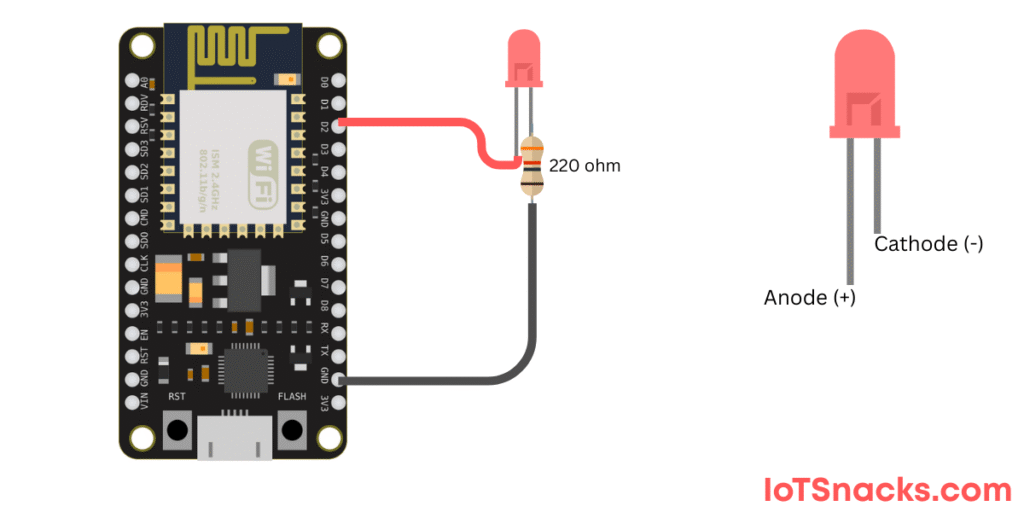
Circuit Diagram
Text description (using NodeMCU / Wemos D1 Mini):
- Connect LED anode (+) to D2 (GPIO4) through a 220Ω resistor
- Connect LED cathode (–) to GND
Arduino Code: LED PWM with ESP8266
// LED Brightness Control using PWM on ESP8266

int ledPin = D2;  // GPIO4

void setup() {
  pinMode(ledPin, OUTPUT);  // Set LED pin as output
}

void loop() {
  // Fade IN
  for (int brightness = 0; brightness <= 1023; brightness++) {
    analogWrite(ledPin, brightness);  // Set LED brightness
    delay(5);  // Small delay for smooth fading
  }

  // Fade OUT
  for (int brightness = 1023; brightness >= 0; brightness--) {
    analogWrite(ledPin, brightness);
    delay(5);
  }
}
Step-by-Step Code Explanation
Define LED pin
int ledPin = D2;
Setup pin as output
pinMode(ledPin, OUTPUT);
Fade in loop
for (int brightness = 0; brightness <= 1023; brightness++) {
  analogWrite(ledPin, brightness);
  delay(5);
}
- Increases brightness from 0 (OFF) to 1023 (FULL).
- Small delay makes it appear smooth.
Fade out loop
for (int brightness = 1023; brightness >= 0; brightness--) {
  analogWrite(ledPin, brightness);
  delay(5);
}
Decreases brightness back to 0.
🔆 Result: The LED smoothly fades in and out continuously.
Real-Life Applications
- Dimmable smart lights
- Breathing LED effect (used in gadgets and routers)
- Fan/motor speed control
- PWM-based sensors and actuators
Troubleshooting
- If LED does not glow → Check resistor connection.
- If LED flickers → Reduce delay to make fading smoother.
Conclusion
With just a few lines of code, you can control LED brightness using PWM on ESP8266. You learned:
- What PWM is
- How to wire up an LED
- Code to fade LED brightness
- Real-life applications of PWM
Next, you can expand this project to:
- Control LED brightness using a potentiometer
- Adjust LED brightness via a web server on ESP8266
- Use PWM for motor control
Can ESP8266 generate PWM on all pins?
Yes, all digital GPIOs support software PWM.
What’s the frequency of PWM on ESP8266?
Default is 1 kHz, but it can be changed using analogWriteFreq().
Can I control multiple LEDs with PWM?
Yes, you can use different GPIO pins for multiple PWM outputs.