
Now Reading: Buzzer with ESP32 DOIT DevKit v1 – Step-by-Step Tutorial
-
01
Buzzer with ESP32 DOIT DevKit v1 – Step-by-Step Tutorial

Introduction
A buzzer is a simple sound-producing device that can be controlled using a microcontroller. There are two types of buzzers:
- Active Buzzer → Produces sound when powered (no special frequency required).
- Passive Buzzer → Requires a frequency signal (PWM) to produce sound of different tones.
In this tutorial, we’ll use a buzzer connected to GPIO 4 of ESP32 DOIT DevKit v1 and make it beep using the Arduino IDE.
Components Required
- ESP32 DOIT DevKit v1
- Buzzer (active or passive)
- Breadboard and jumper wires
- USB cable
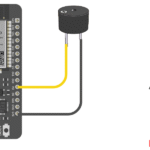
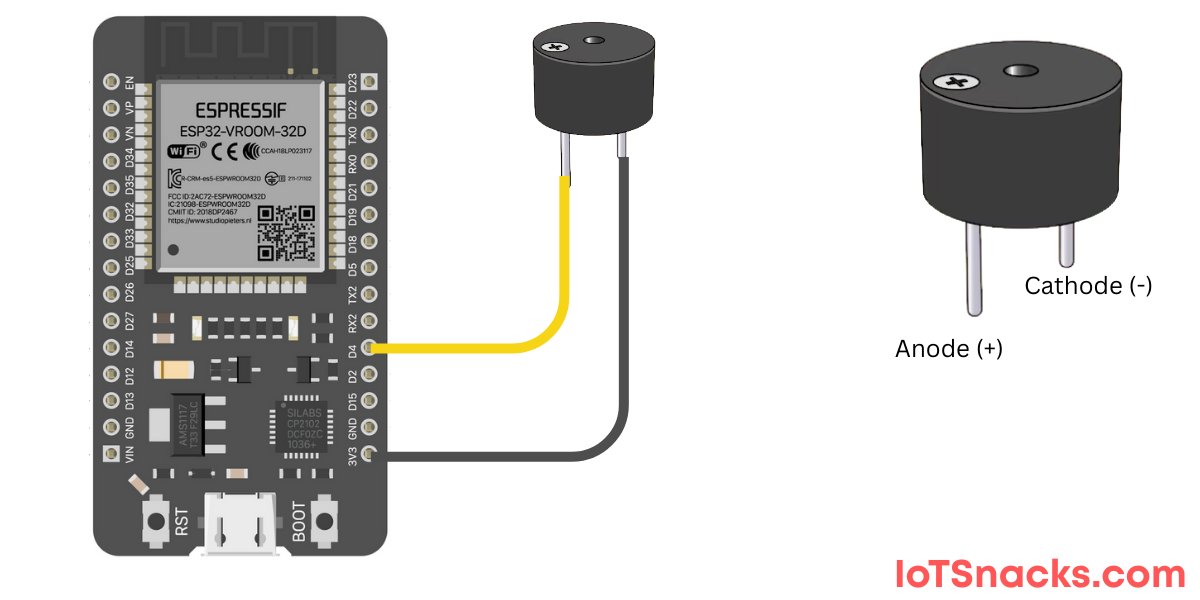
Circuit Diagram
- Buzzer + pin → GPIO 4
- Buzzer – pin → GND
⚠️ If using a passive buzzer, we will control the sound frequency using tone() function.

Arduino Code
// Active Buzzer with ESP32 DOIT DevKit v1
// Buzzer at GPIO 4

int buzzerPin = 4;

void setup() {
  pinMode(buzzerPin, OUTPUT);
}

void loop() {
  digitalWrite(buzzerPin, HIGH); // Turn buzzer ON
  delay(1000);                   // Wait 1 second
  digitalWrite(buzzerPin, LOW);  // Turn buzzer OFF
  delay(1000);                   // Wait 1 second
}
Step-by-Step Code Explanation
Define Pin
int buzzerPin = 4;
Assign GPIO 4 for the buzzer.
Setup Function
pinMode(buzzerPin, OUTPUT);
Configure buzzer pin as output.
Loop Function
digitalWrite(buzzerPin, HIGH);
delay(1000);
digitalWrite(buzzerPin, LOW);
delay(1000);
- Turns buzzer ON for 1 second.
- Turns buzzer OFF for 1 second.
- Repeats continuously.
Output
- With active buzzer: You’ll hear a continuous beep (ON/OFF every second).
- With passive buzzer: You’ll hear a 1kHz tone for 1 second, then silence for 1 second.
Real-Life Applications
- Alarms → fire alarms, smoke detectors.
- Doorbells → sound notification when pressed.
- Timers → reminder sounds in appliances.
- IoT Alerts → buzzers as warnings in smart systems.
- Games → sound effects.
Troubleshooting
| Problem | Cause | Solution |
|---|---|---|
| No sound from buzzer | Wrong wiring | Connect + to GPIO 4 and – to GND |
| Weak sound | Low current from GPIO | Use a transistor driver circuit |
| Noise instead of tone | Passive buzzer used as active | Use tone() for passive buzzer |
| ESP32 reset/restart | Buzzer draws too much current | Use external power with transistor |
What is the difference between active and passive buzzer?
Active buzzers work with simple HIGH/LOW signals. Passive buzzers need frequency signals for sound.
Can I play melodies with ESP32 buzzer?
Yes, with a passive buzzer and Arduino tone library, you can play melodies.
Why is my buzzer very weak?
Some buzzers need more current than ESP32 GPIO can supply. Use a transistor + external power.
Can I control buzzer volume?
Volume is fixed in most buzzers, but passive buzzers can change perceived loudness by varying PWM duty cycle.
Can I use buzzer and LED together on ESP32?
Yes, as long as they are connected to different GPIOs and programmed correctly.