Interfacing 1602 LCD with I2C Module using ESP32 DOIT DevKit v1

Introduction
The 1602 LCD is a 16×2 character display commonly used in electronics projects. Normally, it requires 16 pins for operation, which makes wiring complex. By using an I2C module (PCF8574) attached to the back of the LCD, we can reduce the connections to just 4 pins: VCC, GND, SDA, and SCL.
In this tutorial, we’ll connect a 1602 I2C LCD with ESP32 (GPIO 21 for SDA, GPIO 22 for SCL) and display simple text like "Hello, ESP32!".
Components Required
- ESP32 DOIT DevKit v1
- 1602 LCD with I2C adapter (PCF8574)
- Breadboard & jumper wires
- USB cable
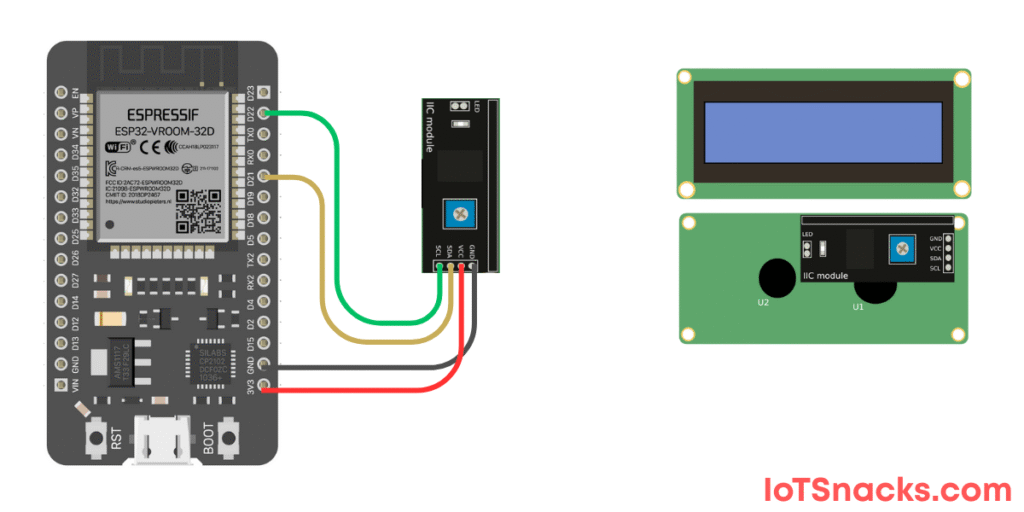
Circuit Diagram
- LCD VCC → 3.3V (or 5V if your module requires it)
- LCD GND → GND
- LCD SDA → GPIO 21
- LCD SCL → GPIO 22
Arduino Code
// 1602 LCD with I2C using ESP32 DOIT DevKit v1
#include <Wire.h>
#include <LiquidCrystal_I2C.h>

// Create LCD object (I2C Address: 0x27 or 0x3F, columns=16, rows=2)
LiquidCrystal_I2C lcd(0x27, 16, 2);

void setup() {
  lcd.init();              // Initialize LCD
  lcd.backlight();         // Turn ON backlight
  lcd.setCursor(0, 0);     // Set cursor to first column, first row
  lcd.print("Hello, ESP32!");
  lcd.setCursor(0, 1);     // Second row
  lcd.print("LCD with I2C :)");
}

void loop() {
  // Nothing here – text is static
}
Step-by-Step Code Explanation
Include Libraries
#include <Wire.h>
#include <LiquidCrystal_I2C.h>
These handle I2C communication and LCD functions.
Create LCD Object
LiquidCrystal_I2C lcd(0x27, 16, 2);
The I2C address is usually 0x27 or 0x3F. Columns = 16, Rows = 2.
Initialize in Setup
lcd.init();
lcd.backlight();
Prepares the LCD and turns on the backlight.
Display Text
lcd.setCursor(0, 0);
lcd.print("Hello, ESP32!");
Prints text on row 1.
lcd.setCursor(0, 1);
lcd.print("LCD with I2C :)");
Prints text on row 2.
Output
- LCD first row: Hello, ESP32!
- LCD second row: LCD with I2C 🙂
Real-Life Applications
- IoT Devices → Show sensor readings (temperature, humidity, etc.)
- Embedded Systems → Display status messages
- DIY Projects → Digital clocks, counters, or smart devices
- Educational Projects → Teaching microcontroller basics
Troubleshooting
| Problem | Cause | Solution |
|---|---|---|
| LCD doesn’t show anything | Wrong I2C address | Use I2C Scanner code to find address |
| Only backlight ON, no text | Wrong wiring | Double-check SDA → 21, SCL → 22 |
| Garbled text | Power mismatch | Use 5V VCC if module requires it |
| Library not found | Missing LiquidCrystal_I2C | Install from Arduino IDE Library Manager |
How do I find the I2C address of my LCD?
Upload an I2C Scanner sketch. It will print the detected I2C address in the Serial Monitor.
Can I connect multiple I2C devices with ESP32?
Yes ✅, I2C supports multiple devices on the same SDA & SCL lines, as long as each has a unique address.
Can I power the LCD with 3.3V?
Some I2C modules work with 3.3V, but most are designed for 5V. Check your module specs.
Can I print sensor values on the LCD?
Yes! Just replace lcd.print("text") with your sensor variable.
What if text exceeds 16 characters?
It will overflow into the next row. You can scroll text using special functions.