
Now Reading: Interfacing NEO-6M GPS Module with ESP32 DOIT Kit v1
-
01
Interfacing NEO-6M GPS Module with ESP32 DOIT Kit v1


Introduction
The NEO-6M GPS module is a powerful, low-cost GPS receiver that allows your ESP32 projects to access real-time location data, including latitude, longitude, altitude, and time. GPS technology is widely used in applications such as navigation systems, asset tracking, robotics, weather stations, and even agriculture monitoring.
The ESP32 DOIT Kit v1, with its built-in UART communication support, makes it easy to integrate the NEO-6M GPS module. In this tutorial, we will connect the NEO-6M GPS to the ESP32 and display GPS data using the Arduino IDE.
Components Required
- ESP32 DOIT Kit v1
- NEO-6M GPS Module
- Jumper wires
- Breadboard (optional)
- Arduino IDE installed
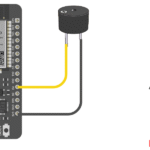
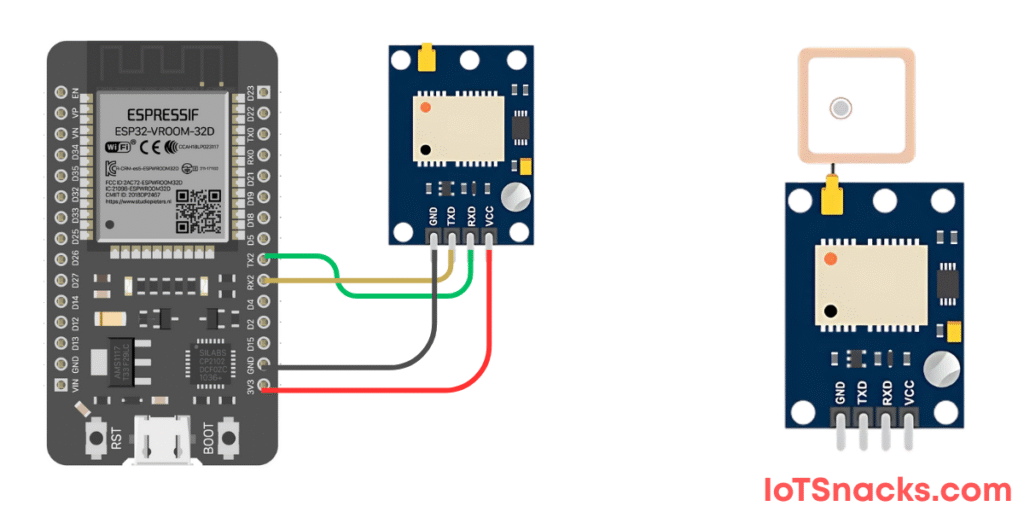
Circuit Diagram and Connections
Here are the connections between the ESP32 DOIT Kit v1 and NEO-6M GPS Module:
| NEO-6M Pin | ESP32 Pin |
|---|---|
| VCC | 3.3V |
| GND | GND |
| TX | GPIO 16 (RX2) |
| RX | GPIO 17 (TX2) |
⚠️ The NEO-6M module usually operates at 3.3V–5V. Since the ESP32 operates at 3.3V, connecting VCC to 3.3V is recommended to avoid damage.
Arduino Code
#include <TinyGPS++.h>
#include <HardwareSerial.h>

// Create GPS object
TinyGPSPlus gps;

// Use Hardware Serial 2 (pins RX2=16, TX2=17)
HardwareSerial SerialGPS(2);

void setup() {
  Serial.begin(115200);          // For serial monitor
  SerialGPS.begin(9600, SERIAL_8N1, 16, 17);  // RX=16, TX=17
  Serial.println("NEO-6M GPS with ESP32 - Reading Data...");
}

void loop() {
  // Read data from GPS module
  while (SerialGPS.available() > 0) {
    gps.encode(SerialGPS.read());

    // Check if GPS location is valid
    if (gps.location.isUpdated()) {
      Serial.print("Latitude: ");
      Serial.println(gps.location.lat(), 6);
      Serial.print("Longitude: ");
      Serial.println(gps.location.lng(), 6);
      Serial.print("Altitude: ");
      Serial.println(gps.altitude.meters());
      Serial.print("Satellites: ");
      Serial.println(gps.satellites.value());
      Serial.println("-------------------------");
    }
  }
}
Code Explanation
- TinyGPS++ library is used to decode NMEA sentences from the GPS module.
- HardwareSerial(2) is initialized on pins GPIO 16 (RX) and GPIO 17 (TX).
- In the
loop(), data from GPS is continuously read. - When new data is available, it prints latitude, longitude, altitude, and satellite count.
Real-Life Applications
- Navigation systems for cars, boats, and drones.
- Asset tracking for vehicles or shipments.
- Weather stations requiring geolocation data.
- Smart agriculture, monitoring equipment across wide fields.
- Robotics, where precise location is crucial.
Troubleshooting
- No GPS data received → Take the GPS module outside for a clear view of the sky. Indoors, it may not get a satellite fix.
- Garbage data in serial monitor → Ensure baud rate is set to 9600 in both code and module.
- ESP32 not reading data → Double-check RX and TX connections. Remember: ESP32 RX ↔ GPS TX, ESP32 TX ↔ GPS RX.
- Long time to get fix → First-time cold starts may take 2–3 minutes.
What is the baud rate of the NEO-6M GPS module?
The default baud rate of the NEO-6M GPS module is 9600, which works perfectly with the ESP32.
Why is my GPS module not getting a location fix?
The GPS module requires a clear view of the sky to lock onto satellites. Indoor usage may result in no fix or weak signals.
Can I power the NEO-6M GPS from ESP32 3.3V pin?
Yes, the NEO-6M module can run on 3.3V–5V. However, always check your module version for safe operation.
Which ESP32 pins are used for GPS communication?
In this tutorial, we used GPIO 16 (RX2) and GPIO 17 (TX2) via HardwareSerial.
Can I use GPS data with Google Maps in ESP32 projects?
Yes, you can send GPS data to IoT platforms or APIs and integrate it with Google Maps for real-time location tracking.