
Now Reading: Single Channel Relay with ESP8266 (Step-by-Step Guide)
-
01
Single Channel Relay with ESP8266 (Step-by-Step Guide)


Introduction
A relay module is an electrically operated switch that allows the ESP8266 to control high-voltage devices like lamps, fans, and home appliances using its low-voltage GPIO pins. Since ESP8266 works at 3.3V logic, it cannot directly switch high-power loads. That’s why we use a single channel relay module, which acts as a bridge between the ESP8266 and AC/DC appliances.
Relays are widely used in home automation systems, industrial control projects, and IoT applications. By connecting a relay to ESP8266, you can control electrical devices remotely via Wi-Fi, mobile apps, or IoT dashboards.
In this tutorial, we will connect a single channel relay to the ESP8266 and control it with simple Arduino code.
Components Required
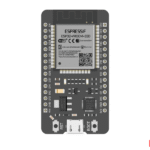
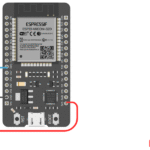
- ESP8266 (NodeMCU / Wemos D1 Mini)
- Single Channel Relay Module (5V)
- Jumper Wires
- Breadboard
- USB Cable
⚠️ Safety Note: Be very careful when connecting AC appliances to a relay. If you’re a beginner, practice with a low-voltage DC load (like an LED strip or 12V bulb) before working with AC mains.
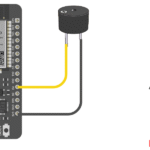
Circuit Diagram (Relay → ESP8266)
- Relay IN → D1 (GPIO5)
- Relay VCC → 3.3V / 5V (depending on relay type, many modules support 5V)
- Relay GND → GND
- Common (COM) and Normally Open (NO) → Connect to your appliance

Arduino Code for Relay Control
// Single Channel Relay with ESP8266
int relayPin = D1;  // Relay connected to GPIO5 (D1)

void setup() {
  pinMode(relayPin, OUTPUT);   // Set relay pin as output
  digitalWrite(relayPin, HIGH); // Keep relay OFF initially
  Serial.begin(115200);
}

void loop() {
  // Turn relay ON
  digitalWrite(relayPin, LOW);  // Active LOW relay
  Serial.println("Relay ON");
  delay(2000);

  // Turn relay OFF
  digitalWrite(relayPin, HIGH);
  Serial.println("Relay OFF");
  delay(2000);
}
Step-by-Step Code Explanation
Relay Pin Declaration
int relayPin = D1;
We connect the relay input pin to D1 (GPIO5) of ESP8266.
Setup Function
pinMode(relayPin, OUTPUT);
digitalWrite(relayPin, HIGH);
The relay pin is set as an output.
By default, the relay is kept OFF (HIGH), since most relay modules are active LOW.
Loop Function
digitalWrite(relayPin, LOW);
delay(2000);
digitalWrite(relayPin, HIGH);
delay(2000);
Relay turns ON for 2 seconds and then OFF for 2 seconds repeatedly.
When ON, it connects COM → NO, allowing current to flow to the load.
Output
- The relay will click ON and OFF every 2 seconds.
- If connected to a bulb or LED strip, it will blink accordingly.
Real-Life Applications
- Home Automation:
Control lights, fans, and appliances using Wi-Fi-enabled ESP8266. - Smart Plugs:
Create your own IoT-enabled plug that can be switched ON/OFF remotely. - Irrigation Systems:
Turn ON water pumps automatically based on soil moisture levels. - Industrial Automation:
Switch heavy machinery or motors with safety isolation. - Security Systems:
Use relays to activate alarms, sirens, or emergency cut-off switches.
Troubleshooting
- Relay Not Switching ON:
- Check if your relay module is active LOW or active HIGH. Adjust your code accordingly.
- Ensure the relay VCC is supplied with enough voltage (3.3V or 5V depending on module).
- Clicking Sound But Load Not Working:
- Check wiring of COM and NO pins.
- Make sure your load is connected properly and powered correctly.
- ESP8266 Keeps Restarting:
- Some relays draw high current when switching. Use a separate 5V power supply if needed.
- Relay Works Opposite (ON when OFF, OFF when ON):
- Invert the logic in code (
HIGHfor ON andLOWfor OFF).
- Invert the logic in code (
- Danger with AC Loads:
- Always use relays with opto-isolators for AC appliances.
- Beginners should test only with low-voltage DC loads first.
Can ESP8266 control a relay directly?
Yes, ESP8266 can control a relay module using its GPIO pins. However, always use a relay module with a driver circuit for safety.
Is the relay active HIGH or active LOW?
Most single channel relay modules are active LOW, meaning the relay turns ON when the GPIO output is set to LOW.
Can I connect AC appliances to the relay?
Yes, you can connect AC appliances (like bulbs or fans), but always take proper safety precautions when working with high voltage.
Can I control relay over Wi-Fi using ESP8266?
Yes, with ESP8266 Wi-Fi, you can control the relay via Blynk, MQTT, or Arduino IoT Cloud for remote access.
Which pin of ESP8266 is best for relay?
You can use GPIO5 (D1), GPIO4 (D2), or GPIO14 (D5) for stable relay operation.